Deploying a computer vision model
Training and publishing a computer vision model on the web.
Try It Here!
- 🧪 Lightweight JavaScript demo
{you may need to visit the gradio/huggingface link below to wake up the app if it has been a while} - 🚀 Full-featured Gradio app
Table of Contents
- Training a new model based on human labeled images
- Downloading images with labels
- Cleaning input images for model fine tuning
- Testing performance and iterating
- Saving and exporting the model
- Publishing and Predicting
- HF Gradio App
- Lightweight Javascript API
- Next Steps
- trim top and bottom of camera trap images to avoid the brand logos
- Crop (to crop or not to crop) images and try fine tuning speciesnet
The goal (why do this?)
Urban Rivers aims to improve urban environments for animals and humans by revitalizing waterways with floating wetland installations. To understand the effect of installations, they aim to study changes in wildlife and human use in and along the chicago river. Changes in biodiversity and species abundance before and after the installation of floating wetlands would be evidence of an effect. How to gather this data? At least in-part through observations made using motion capture cameras.
Why AI: Because motion capture cameras have a high false positive image capture rate ( nothing in the picture ). Early estimates have this false positive rate at ~90%. This is why using computer vision to accelerate data capture is a huge help. We’re also making use of volunteer labeling to train AI - because correct identification requires some specialized knowledge.
I previously attempted to use SpeciesNet to classify our images without any additional fine-tuning and had variable results. This time, I wanted to see what we could do with the images we have labeled so far - with an eye on getting more of the location specific categories correctly labeled.
Training a computer vision model
All training took place on the kaggle platform. I chose kaggle for easy access to a GPU based on the expected need for fine tuning/training.
To get the images, I fed a long list of target species to the website’s api and parsed the JSON response. ChatGPT was very helpful for making lists and troubleshooting the api.
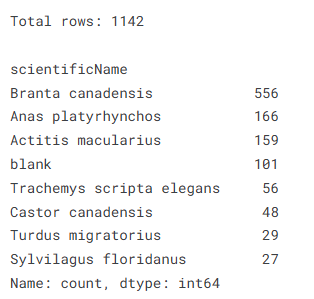
After getting metadata from 12118 image observations (images that had at least one observation) there were a few cleaning steps to do. At each step I rendered a snippet of the data to confirm what was happening was intentional. Cleaning involved deduplication, filling None values with “blank”, making sure that at least 3 people made the same species observation, filtering out multiple species (a tougher problem) and keeping single species or blank only images.
At the end of cleaning we had 1228 images remaining (only about 10%) with only 4 categories having over 100 images, and a total of 9 categories with at least 26 pictures.
Normally, we would want at least 100-200 images per class - but at this moment that would only let us train on canadian geese, ducks, spotted sandpipers, and blank images. So in order to keep things interesting I set a threshold of at least 26.
From there it was a matter of downloading each species into an images/species_name folder - this structure is popular for many deep learning applications and has support in the fastai infrastructure. The parent folder indicates the target class - so loading images into fastai’s dataloaders/datablocks can take advantage of the parent_label function at the same time as resizing and conducting some augmentation transforms.
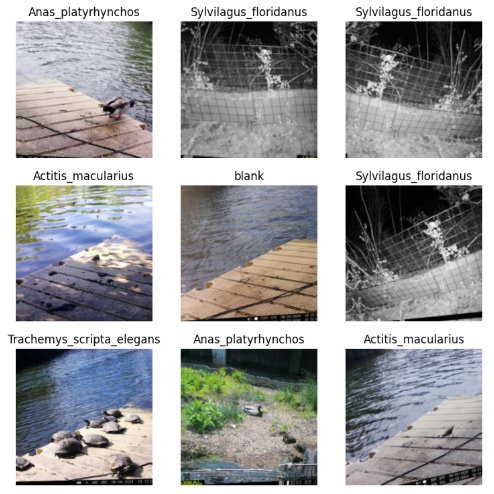
The aug_transforms() used essentially - while fine-tuning the model - provide some image alterations to expose the CNN to variations of the photos. It’s a great way to bolster your image numbers when you have small to medium datasets. Here’s a small panel that show some of the augments:
I decided to try ResNet18 - because that’s in the example for the fastai documentation (#overly-honest-methods).
Training started to converge at 5 epochs, so for the sake of iteration in the future I stopped there. Here’s the confusion matrix from only 26 images each (5 held for validation). Not bad! - clearly some issues with blanks, sandpipers and ducks but that has to be expected with the small dataset.

Here’s a small prediction outcome panel from images withheld from training and validation (test images):
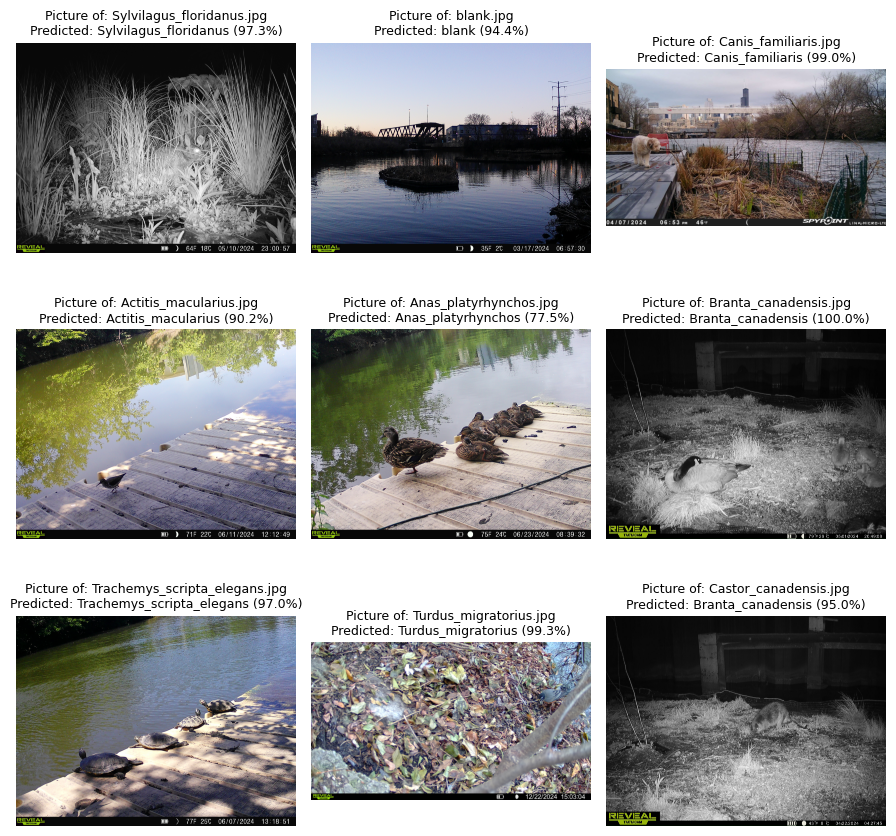
The lower right corner shows a good example of why goose and beaver might be hard to differentiate. The deployment is the same in those photos (camera location) and it also looks like the reveal logo is larger for that model of camera. This is exactly the reason that SpeciesNet version B expects some of the image trimmed on the top and bottom: it’s entirely possible that the model is using that portion of the image to make predictions (leakage). Our batch augmentation does remove a few of the issues, but in the future we should add cropping to the item transforms.
Full Cleaning and Training Notebook attached:
Publishing the new model for testing
The goal in this part of the project is just to learn what it would take to publish the new fine tuned model to the web for people to try.
As luck would have it - this part is also free; thanks to hugging face spaces + gradio. First the app is developed in a jupyter notebook, then thanks to nbdev package - that notebook can be converted into an app.py. Huggingface spaces provides a lot of help for initializing the project, too.
Here’s the notebook used for development of the gradio app:
Lastly - Huggingface Spaces also provide an API endpoint for running the gradio app - this includes a javascript implementation for a very lightweight deployment right here.
Next Steps
Our model, while achieving about 78% accuracy in the training and validation datasets, does a poor job of generalizing to new images. To iterate and improve here’s a short list of what to do first.
- Trim the top and bottom of images
- Striate the location/deployment (requires additional metadata)
- Examine images labeled by humans and by Speciesnet/Version 1 of the fine tuned model to refine the dataset used for tuning
- Try fine-tuning on the model version B of speciesnet
Update
The original dataloaders object was being passed “Resize(224)” - this was doing a center crop and removing the target species sometimes. By adding Resize(224, method=’squish’) and a class for cropping the top and bottom - this was resolved while also removing the cameratrap overlays.
This, plus checking timm for state of the art models and switching to ConvNeXt_tiny improved the error rate from 22% to 11%!